Displaying items by tag: exercise
Save Your Feet & Ankles: Return To Training Slowly
Like clockwork, every spring we hear the same complaint in our office:
"I had pain in my feet/ankles/toes after I ran. And then I ran the next day and they hurt more. I can't understand it, because I'm running exactly the same route I did as last year."

Each spring, every athlete is anxious to jump right back in where they left off. But we forget just how quickly our bodies get out of condition, especially as we age.
Your body has de-conditioned over the winter months (assuming you're not working out regularly at the gym). Ligaments, muscles, bones, and interconnective tissue have become much weaker from lack of use. When we demand the same from them as we did when we were in peak condition at the end of last season, the disconnect between desire, endurance and strength becomes obvious. The result is soreness, stiffness, tendonitis, sprains, fractures or worse, which could sideline us for months.
Whenever we have a significant break from our training schedule, even a few weeks, it's important to build back up slowly to pre-break levels. This is especially true when we lay off all winter, or when we're recovering from an injury or an illness.
In fact, your hard-earned fitness can begin decreasing in as little as 2 weeks, especially if you're in peak condition. According to Dr. Edward Coyle, the director of the Human Performance Laboratory at the University of Texas at Austin, the maximum oxygen that an athlete can uptake and utilize (your endurance) plunges in the first month of inactivity and continues to decrease for the next 3 months of inactivity. Even the enzymes involved in metabolizing energy become less active. In fact, for the casual athlete, all the benefits derived from the previous season - the ability to uptake and utilize oxygen - may be completely lost when they lay off their routine for 4 months or more.
And after your endurance decreases, your muscle mass and strength also take a hit. Which is when you feel ankle pain or heel pain pushing that last mile.
 The good news is, if you've been a runner or otherwise training for 10 years or more, you can maintain fitness longer than those who've been at it for less time. And highly trained athletes don't decline to the same levels as the casual athlete, even after a long layoff.
So how do you get back into condition?
- Take it slow and don't go BIG right from the start. Begin by working below your break point and don't push
- Warm up for longer periods before your workout. Make sure you've stretched your legs, feet and ankles sufficiently
- Allow 1 day of rest between each run or workout. More if you have pain or soreness in your knees, shins, feet or ankles.
- Focus on consistency and good habits, not speed
- Progress gradually and extend your workouts by a small amount each session
- If you feel any pain, stop immediately. Resume your training only when the pain has completely subsided
- Wear a new pair of athletic shoes to support your feet and legs properly
Breaks are an important part of training, as they're important for your physical and mental health. They can also help you come back stronger and faster. Your best bet is to rest when injured or ill and do some cross-training in the gym during your downtime to maintain strength and endurance. That's a far better strategy than hurting yourself every spring.
Simple Yoga Exercises To Strengthen Your Feet, Ankles & Toes
If you've ever taken a yoga class, one thing was probably clear immediately: your feet and ankles weren't nearly as strong as you thought they were. In the U.S. and much of the world, we go about our daily business in shoes which protect our feet and our health. If we're athletes, we buy shoes which protect our feet from injuries and hopefully give us a little extra juice when we need it.
But on the downside, those shoes can prevent the muscles in our feet from getting the exercise they need. And as we age, it shows: bunions, hammer toes, aching arches, aching toes, poor balance, and a host of other maladies (some of these are inherited traits).

Strong feet and ankles are essential for anyone, and especially as we age, to maintain our balance. Running, biking, weight lifting and any athletic activity is great, but they tend to develop one side of the body more than the other, due to our natural left-hand, right-hand propensity. Yoga aims to create equal strength and also loosens the joints, helping them avoid injury and maintain flexibility.
One of the first lessons in yoga is how to stand. This may seem silly at first, but our feet are our foundation, and we quickly learn that we need to unlearn some bad habits. Over the years we lean into the sides of our feet, lean back on our heels, lean forward, or shift weight from sore areas. All of these habits change the way we walk and stand, throwing our legs and ankles out of alignment and placing stress on other parts of our body. The result is pain and stiffness anywhere between the toes and neck.
Try these simple yoga-based exercises to build strength in your ankles, feet and toes. Do all exercises barefoot on a flat surface. If you have medical problems with your feet or ankles, or are obese, consult your physician before attempting.
Learn To Evenly Distribute Your Weight
The strength of your feet - and especially your arches - determines if your leg is aligned with your ankle. Strengthening your arches starts with an awareness of how you stand.
Standing upright in bare feet, sense where your weight falls in your feet. Your feet are meant to carry your body weight evenly - not back on the heels or on the balls of your feet. Press down evenly through the heels, the balls, and your toes. You'll feel the difference in your balance immediately. While standing upright and evenly balanced, spread the soles and toes as much as you can and reach the toes forward.
Stretch and Strengthen Your Feet
One of the most common yoga poses, Downward-Facing Dog, stretches the soles of your feet and strengthens your arches. In this position, gently push your heels toward the floor as much as possible. Learn how to do it here.

To stretch the tops of your feet and strengthen your ankles, try Hero Pose (only do this if you have no knee problems). Kneel on the floor, keeping your thighs perpendicular to the floor and touch your inner knees together. Slide your feet apart, slightly wider than your hips, but keep the tops of your feet flat on the floor. Then sit down between your feet. If your buttocks don't rest comfortably on the floor, support them with a thick book placed between your feet. Now lift your sternum, sitting as upright as possible, and try to release your shoulder blades away from your ears. Hold for 1 minute.
Raising yourself on your toes is a simple and excellent way to strengthen your feet. While this may seem easy at first, try doing it very slowly. You'll be surprised at how much effort you'll expend.
Strengthen your toes
Stand with your feet so that they're directly under your hips. Try to lift just the big toe on each foot, while keeping the other toes on the floor. Then do the opposite: lift all the toes except the big toe. Switch back and forth. You'll find that one part of that exercise will be a lot easier than the other. That's because those who pronate (roll the foot inward when they walk) typically have a hard time lifting their big toes, and those who supinate (roll the foot outward) have a hard time lifting the other toes.
Leaning is Exercise
Leaning teaches us how to balance our weight across our feet. Those who shift their weight to their heels leave the front of their foot without much to do, and the foot weakens.
Stand with your feet a comfortable distance apart and put a soft bend in your knees. Lean forward at the ankle as if you were about to ski down a slope. Do not lean from the waist or hips - keep the lean in your ankles. This exercise wakes up the muscles in your toes and the soles of your feet.
If your feet feel tired after these exercises, that's good - it means that the muscles are being worked. If your feet are sore, that's not good - back off a little next time around.
Pain In The Ball of Your Foot? It's Probably Metatarsalgia
Did you ever have one of those really active days - running, hiking, jumping, maybe just standing for a really long time on your feet - and the balls of your feet ached like crazy? Well my friend, you were probably suffering from the dreaded Metatarsalgia.
 Metatarsalgia isn't as serious as it sounds. It simply refers to minor pain and inflammation of fatigued and overused metatarsal bones (the long bones in your feet). The pain appears in the area where the metatarsals join your toe bones, otherwise known as the ball of your foot - the area of your sole behind your toes (not just behind the big toe). The pain usually begins as a mild ache and worsens over a period of months.
Usually, metatarsalgia is caused by ill-fitting shoes combined with lots of activity. Most cases of metatarsalgia aren't serious, and rest, ice and over the counter pain medicine will resolve the pain.
But if left untreated, the classic cascade effect may kick in: The balls of your feet hurt, so you unconsciously shift weight to other parts of your feet, which eventually causes pain in those areas, which again causes you to shift your weight. Since your legs, ankles and feet are drifting farther out of alignment, the joints above your feet start feeling the impact and you suddenly have pain in your knees, back, or hips. And it all began with minor, treatable pain in your feet.
Prolonged metatarsalgia which doesn't resolve in 10 days should always be reported to your podiatrist, as it can be a symptom of other, more serious conditions.
Symptoms of Metatarsalgia include
- Sharp, aching or burning pain at the head of the metatarsals, in the ball of your foot, just below and underneath the toes
- Pain that becomes worse when you're on your feet, especially when running, walking or flexing
- Pain decreases as you rest
- Sharp or shooting pain, numbness, or tingling in your toes
- A feeling of having a pebble in your shoe
 Contributing factors to Metatarsalgia

Intense training. Most runners are accustomed to occasional bouts of metatarsalgia, as the front of the foot absorbs significant shock when running. But this can be true of anyone who plays a high impact sport, especially basketball, soccer, tennis, football, or track and field events. It's sometimes a sign that your athletic shoes are worn out and need to be replaced.
The shape of your foot. If you have a high arch, extra pressure is placed on the metatarsals, increasing the chance of pain from overuse. If your second toe is longer than your big toe, more weight than normal is shifted to the 2nd metatarsal head, and that may cause pain as well.
A muscle imbalance. Tight toe extensors or weak toe flexors don't properly support the metatarsal bones and may cause fatigue and pain from overuse. A too-tight tight achilles tendon may be a contributor as well.
Stiff ankles, perhaps the result of a previous injury or arthritis, don't support the foot correctly, placing too much pressure on the forefoot.
Excessive pronation - the side-to-side movement of your foot - may contribute.
Foot deformities such as flat feet, bunions, gout, arthritis and hammertoe can cause metatarsalgia. Many patients with bunions complain of pain in the balls of their feet.
Carrying too many pounds. Your forefoot carries most of your body weight when you walk of run. Extra pounds means extra pressure on the metatarsals. Additionally, as we age, the fat pad in the foot tends to thin out, reducing its cushioning effect. A weight management plan may reduce your symptoms.
Poorly fitting shoes and high heels. That's right, ladies. While high heels make you look great, they're murder on your feet (like I had to tell you that). High heel shoes are a very common cause of metatarsalgia in women, as they transfer your body weight to the front of the foot, working against how the foot is designed to carry your weight. Athletic shoes which don't support your feet correctly are also guilty of causing metatarsalgia.
Stress fractures in the metatarsals or in the toe bones change the way you walk, which may result in metatarsalgia.
Morton's Neuroma, a growth of fibrous tissue around the nerve between your 3rd and 4th metatarsal heads causes symptoms similar to metatarsalgia.
Your podiatrist may recommend one or more of these treatments for Metatarsalgia
- Rest and complete non-weight bearing for at least 24 hours
- Ice
- Over the counter pain medicine such as advil or aleve
- Cortisone injection in the sore area to relieve pain and inflammation
- Pressure bandage on the sore area
- Ultrasound therapy
- Custom orthotic devices to support and realign your feet
- Metatarsal pads
- Change in footwear (usually to good quality athletic shoes with proper support or flat shoes with a wide toe box)
- When pain has subsided, stretching and strengthening exercises for your feet, supervised by a physical therapist
- Alternate forms of activity may be recommended such as swimming or bicycling
- Weight management if you're overweight
Improve Your Golf Game By Strengthening Your Ankles
One of the keys to a killer golf game is strong ankles. As your ankles and feet are the only body parts in contact with the ground when you swing your clubs, keeping them in peak condition is essential.
 Every golfer knows that their game depends on their swing and their swing depends on balance. If you have poor mechanics or tend to shift your weight, your balance will suffer and your swing will go off the rails. Strong ankles are key to maintaining your balance and hence your swing, so you'll spend less time in the sand trap. Or complaining of back pain.
The exercises below are meant to strengthen ankles and calf muscles, including ankle inverters and everters, responsible for the side-to-side movement of your feet. Strengthening these groups of muscles is extremely important for stability through your golf swing, especially on uneven surfaces.
1. Raise yourself on your toes. This is pretty self-explanatory. It's simple and very effective at strengthening the muscles in your calf, foot and toes.
While lightly holding on to the back of a chair to mainatin balance, slowly raise yourself on the toes of both feet. Repeat 10 times. For a challenge, try raising one foot off the ground, shift all of your weight to the opposite foot, and raise yourself on the toes of just one foot.
If you're in decent shape and would like a bigger challenge, hold on to light free weights while doing this. Don't go too heavy on the weights or you'll place undue stress on the muscles and do more harm than good. For balance training, alter your stance by pointing your toes in or out, or place one foot in front of the other.
2. Balance yourself on one leg. Not much explanation needed here. Pick one foot off the ground and hold for 20 seconds. Repeat with the other foot. If you're just starting, make sure you have a table or chair close by to hold onto until you maintain your balance. For "advanced users", stand on a pillow, which will simulate an uneven surface.
3. Stretch your heels and calf. Runners will be familiar with this one, as it's excellent at stretching out your heel cords. Stand facing a wall, keeping your back straight. Place your hands on the wall. One leg should be slightly forward and bent and the other leg extended behind you with the heel flat and the toes pointed in slightly. Keep both heels flat on the ground and press your hips toward the wall. Hold for 30 seconds and repeat. Then switch legs and repeat. To add an ankle stretch, perform the stretch from this position again, but bend both knees slightly. Keep your hips centered over both feet.
4. Sitting calf and ankle stretch: Sit on the floor with both legs extended straight. Loop a hand towel around the ball of your left foot and grasp the ends of the towel. Gently pull the towel towards you while keeping your leg straight. You'll feel the stretch in your calf and ankle. Hold for 30 seconds and repeat with the right foot.
5. Increase your ankle's range of motion. Sit in a chair of sufficient height so your feet do not touch the floor. Leading with your big toe, write each letter of the alphabet with your foot. Keep the movement small, using just your foot and ankle only, not your leg.
6. Strengthen your ankle's dorsiflexion and plantar flexion. You'll feel the muscles going to work in your calf, shin, the back of your heel, and the top of your foot. With your legs straight our in front of you and your heel on the floor, anchor an elastic band on a chair or table leg, and then wrap it around your midfoot. Pull your toes toward you and push your heel forward. Repeat 10 times. This strengthens dorsiflexion. To strengthen plantar flexion, loop the elastic band around the ball of your foot and hold the ends in your hand. Without pulling on the band, point your toes forward and then slowly return to the starting position. Repeat 10 times.
Keep your ankles in tip-top shape and you'll have a much better time on the greens.
My Child Has Heel Pain: Is It Serious?
One of the most important aspects of a child's physical and emotional development is game play - the kind that doesn't involve sitting in front of a video screen. Organized sports, activities like climbing trees, biking, going for a swim, or just playing imaginary games with other kids in the neighborhood are all positive for their growth (think running, walking, jumping, moving - organized or otherwise). Good habits learned early follow a child into adulthood, and are key in combating the childhood and adult obesity epidemic.

But of course, foot, ankle, and heel pain complaints and other injuries run hand-in-hand with activity. Parents should note that the cause and symptoms of heel pain in children can be considerably different from heel pain in adults. If you've experienced heel pain, specifically plantar fasciitis, you know that its very bad in the morning, but diminishes as the tissue warms up with activity.
But in children, heel pain usually becomes much worse as the day wears on, and may be due to a condition called Sever's disease, an inflammation of the growth plate in their heel. This condition is especially common in children who are highly active or overweight. Heel pain in adolescents may also be due to plantar fasciitis, fractures in the heel bone, bursitis, achilles tendinitis, or other conditions. The good news is, a podiatrist can successfully resolve Sever's disease or other heel pain conditions in your child in almost every case.
Check out the Facebook page for NFL Play 60 to see how you can encourage your child to be more active.
When your child doesn't complain about their heel pain
Unfortunately, some children are slow to complain about heel pain and other injuries, which is where parents have to keep a watchful eye. When a child has pain in their heel, or pain elsewhere in their foot or ankle, it can cause any number of changes in the development of their bodies, as they shift weight and change their gait to compensate for the pain. This imbalance also makes them prone to further injuries. Parents should be mindful of changes in their children's body langauge and behavior, so that a heel pain injury can be addressed early.
Your child may be experiencing heel pain if you notice any of these changes:
- Difference in the way they walk
- Favoring one foot over another
- Occasional limping
- Walking on their toes
- Unusual fatigue
- Problems running
If your child complains about heel pain (or any other kind of pain), take it seriously and don't encourage them to "walk it off" or "play through it" - that's old school advice and may cause more damage in a person of any age. Your child should immediately leave the game or curtail their activities. To treat the injury at home, they should rest, ice their foot, and use an age and weight appropriate dose of advil or aleve to manage the pain. They should not resume strenuous physical activity until the heel pain has completely subsided. When your child resumes activity, it should be gradually, accompanied by appropriate stretching exercises to warm up their ankles and feet. Children should also wear athletic shoes which support their feet properly (but it's okay to let them run barefoot when appropriate).
If your child's heel pain continues for more than one week, make an appointment to see a podiatrist for an exam and diagnosis. Early intervention and treatment is the key to successfully resolving their complaint so they can get back to kid stuff as soon as possible.
Do Your Feet and Ankles Hurt After A Day Of Skiing?
Skiing is a high speed sport involving quick turns at high speed down a sloped terrain, making huge demands of your feet and ankles. When you make those turns, your foot flattens, your ankle bones lower, and your leg rotates toward the opposing leg. That puts massive stress on everything below your waist. But even with all of that stress, you should never experience pain in your feet or ankles after a day on the slopes, assuming it was accident-free. If your ankles or feet are throbbing, sore, or icy cold when you end up in the lodge, your boots may need adjustment or refitting, or may need to be replaced. But your skiing technique may also contribute.

Do your ski boots fit correctly? Are they the right boots for your skill level?
In skiing, your boots are your most essential gear, because movement is initiated in the feet and ankles. They should offer plenty of support, but still be flexible enough to allow forward and lateral flexing ankle movements. Ski boots that are too soft or too stiff for your ankle strength and skill cause dysfunctional ankle movement, resulting in pain.
If your ski boots don't fit correctly, your foot may literally bounce around inside your boot, referred to as ankle and heel slop. Boots which are too large - even slightly - cause the ankle to sit too low in relation to the boot's intended ankle pocket area, and this impacts ski turning biomechanics. The result is again, dysfunctional movement patterns which may cause ankle pain.
Contributing to your discomfort can be irregularities in your foot or ankle, such as former sports injuries which become aggravated, or new conditions, such as bunions.
Experienced skiers arrange for foot beds and boot alignment. Professional boot fitters correct your actual ski stance to a neutral position, called canting. The stance of some skiers may need to be moved forward, some more upright. A boot fitter will also mold the boot's inner lining to your foot's unique shape. If you're experiencing ankle pain, tell the boot fitter about it, and they'll make the appropriate adjustments. But canting and alignment are not magic bullets - you should also select boots appropriate for your skill level.
You may want to consider asking a podiatrist to mold custom orthotics for your ski boots to stabilize your foot.
Do your feet ache? Do they cramp after a day on the slopes?
If your feet ache or are cramping after skiing, it's usually due to the overexertion of the muscles on the bottom of your foot - they're working too hard to maintain control of your skis. This is also a problem with the fit of your boots.
Do your feet turn icy cold?
If your feet become icy cold after a day on the slopes, you either need to wear thicker socks, or you may be overtightening your boots in an effort to control your balance and foot movement. It's never recommended to overtighten your boots for balance, as it creates a false sense of confidence, which could get you in big trouble. Tightening your ski boots also cuts off circulation and causes cramping, which may in turn cause ankle pain.
Is your skiing technique hurting your feet?
Your turning technique may also be to blame for your foot or ankle pain. A smooth turn initiation helps skiers carve clean, controlled arcs. Abrupt turn initiations are jerky, which causes the skier to bang their ankles against the inside of the boot, causing pain. Begin a ski turn by gently and gradually tipping your skis on to their edges.
Basketball: Strengthen Your Feet and Ankles to Avoid Injuries
It all comes down to one weak muscle, tendon or ligament. One second you're a young LeBron. The next, crumpled on the court, writhing in pain, out for the season.
[caption id="attachment_4812" align="alignleft" width="400"] UC Santa Barbara player Zalmico Harmon. Note how his right foot is flat on the court and his leg is bent outwards as he's pivoting. Your ankles and feet had better be in excellent condition to do that every day.[/caption]
Basketball demands a lot of your ankles and feet - they're subjected to sudden, explosive movements, quick turns, and a relentless pounding on a hard surface. If your lower extremities aren't in perfect condition, a lot can go wrong very quickly. The best way to avoid a missed game or worse, a lost season, is to keep your feet and ankles (and the rest of you) in peak condition. These exercises will work muscles, tendons, and ligaments in your toes, feet, and ankles which are often neglected, at the athlete's risk.
But before we get into that, we'd like to mention that a basketball player should use braces and tape as little as possible during training. They're very useful when recovering from an injury, but for training purposes, they'll work against you. If the muscles in your feet and ankles are immobilized and artificially supported by tape or other means, they don't get worked. And a muscle that doesn't get worked is a weak muscle.
Occasionally you should train in bare feet. We know this isn't a practical suggestion in a public space, but when you're working out solo at home, ditch the basketball shoes whenever possible. The foot is the base of the ankle - build it naturally, without restraint, for better balance, mobility, and strength.
1. Loosen your plantar fascia and foot muscles
While sitting, roll a tennis ball around with the bottom of your foot, applying light pressure. Work it under the arch, the toes, and your heel for 5 minutes on each foot.
2. Develop your Dorsiflexion and Plantar Flexion
When your feet flex upward toward your body, it's dorsiflexion, as when you land on the court after a jump. When the foot flexes down or away, it's plantar flexion, as when you make a jump, sprint, or cut. To condition your muscles to endure this full range of motion, perform a unilateral stretch:
- Stand on one leg, bend forward, and place your hands on a wall for balance.
- Stretch your calf muscle and achilles tendon by pushing down on your knee and keeping your foot flat.
- Raise yourself on your toes to stretch your calf.
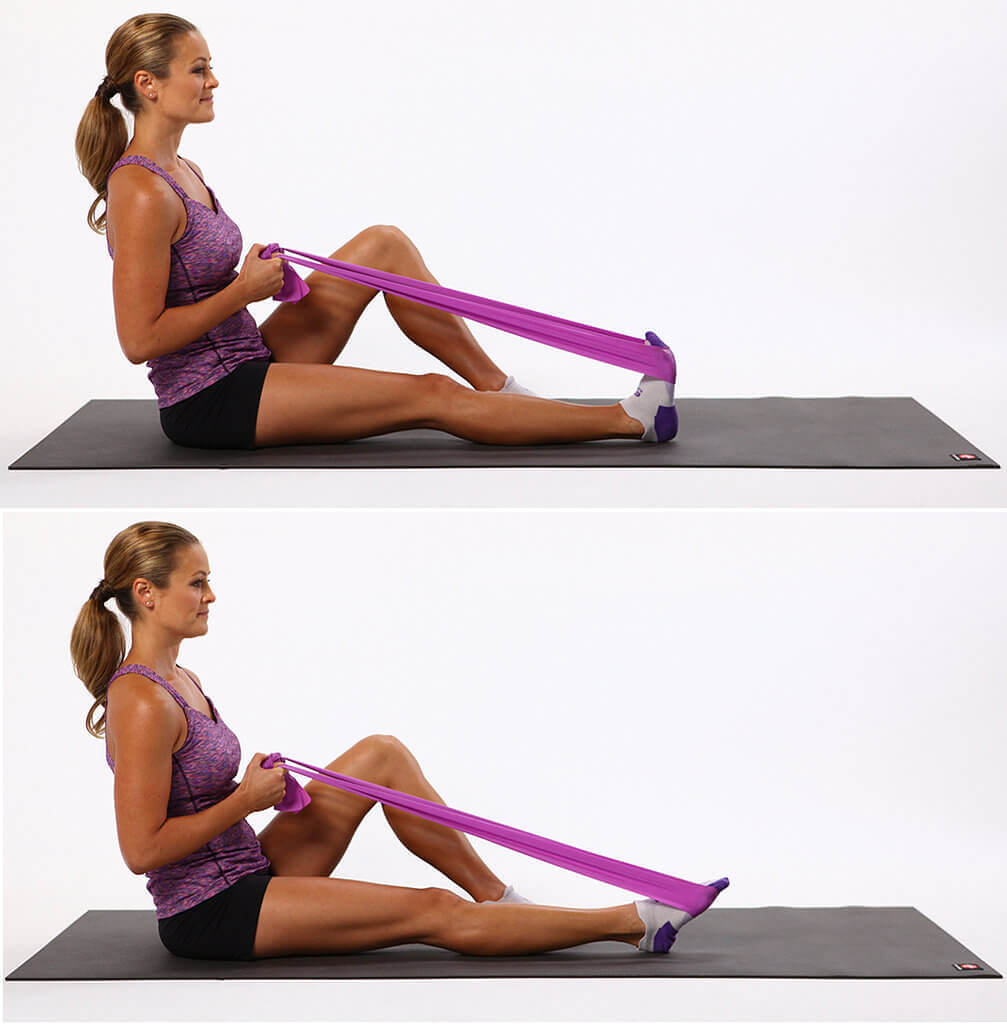
3. Develop Ankle Strength
- Wrap a band around the ball of your foot. Pull back, creating tension on the band, but just enough so you can still move your foot. Push your foot against the band and hold for one second. This strengthens the muscles used for plantar flexion.
- Wrap the band around the ball of your foot and pull to create tension. Then push on the foot with the other foot. Pull your toes back toward you, hold for one second, and release. This strengthens the muscles used for dorsiflexion.
- Start in the same position as above. But this time, keep your foot straight and rotate it outward. Hold for one second. This increases the strength of the muscles that control eversion and inversion, the movements that tilt the sole of the foot towards (inversion) or away from (eversion) the midline of your body.
Take the time to do the proper conditioning, and chances are you'll stay safe on the basketball court. If you experience any pain at all, take a break and get the advice of your trainer before continuing. Then follow up with a podiatrist who is expert in sports medicine for a full evaluation.
10 At-Home Exercises to Relieve Bunion Pain
A bunion is a deformity which occurs when the head of the first metatarsal bone behind the big toe angles out from the foot, pushing the toe toward the adjacent toes (in most cases). The protruding metatarsal head irritates the soft tissue, causing soreness on the side, top and bottom of the foot. Additionally, muscles and tendons in the foot become cramped, tired, and fatigued.
[caption id="attachment_4734" align="alignleft" width="225"] Yep, that's a bunion.[/caption]
In most cases, a bunion develops due to faulty biomechanics in the foot. You'll read a lot of info online that blames high heels and even ballerina shoes for bunions, and while they might contribute to the condition, the root cause is usually genetic. Any podiatric surgeon whose been at it for a decade or more will tell you that he or she has corrected bunion deformities in members of the same family - usually mothers and daughters, but a few sons thrown in for good measure. Faulty arches, flat feet, and loose ligaments, tendons, and muscles are inherited from our parents. We stuff our feet into too-tight shoes, high heels which shift our body weight to the front of the foot, and inexpensive shoes which offer no support to our arches. Combine all of these factors, and voila! A bunion!
Once a bunion starts forming there is absolutely nothing you can do to reverse it, as the metatarsal bone is already out of alignment. But you can slow the progression of the bunion and strengthen the toe and foot muscles to relieve pain and discomfort and increase flexibility. If one of your parents or older siblings have bunions and you don't, proper shoes and strengthening exercises may help delay the onset of your bunions.
Here are some exercises to relive bunion pain:
Sitting exercises for bunion pain relief
- Stretch your big toe. Using your fingers, pull your big toe into proper alignment and hold for ten seconds. Repeat 4 times.
- Flex, stretch, and contract your toes to keep them limber and reduce foot pain and fatigue. Point your toes straight ahead for 5 seconds and then curl your toes under for 5 seconds, as if you're trying to grab something with your toes. Repeat 10 times.
- Resistance. Wrap a towel around your big toe. Use the towel to pull your toe gently towards you while simultaneously pushing against the towel with your toe.
- The ball roll. Place a golf ball or tennis ball under your foot and roll it around for a few minutes. The ball gently massages your arch, which will help to relieve cramping in the muscles.
- Pick up a towel. Spread a small towel flat on the floor in front of you. Then try and pick it up with your toes. This is fantastic for strengthening your toes and improving flexibility.
- Play with marbles. Place 12 marbles on the floor in front of you. Pick them up with your toes and move them to a basket. This gripping exercise improves strength in a similar way to the towel exercise above.
Standing exercises for bunion pain relief
- Walk in sand. If you can, walk barefoot on the beach. This gives your feet a gentle massage and strengthens them in the most natural fashion. Stroll the beach sans sandals whenever possible.
- The tennis ball lift. While standing, squeeze a tennis ball between your ankles. Then raise up on the balls of your feet, keeping your ankles level. Slowly lower yourself back to the floor. This strengthens the muscles which help to align your foot and ankle.
- A little toe exercise. While standing, curl all of your toes up off the floor. Then, touch only your little toe to the floor. Raise the little toe back up again until it's even with the other toes. This exercise strengthens the muscles that run from the little toes up the sides of your legs.
- Yoga Toe. Stand straight up and curl all of the toes on one foot off the floor. Hold the three middle toes in the air, then lower the big toe AND the little toe to the floor simultaneously. Then lift the little toe and big toe back up together. This is incredibly difficult, but will balance the muscles in your feet, as taught in yoga.
Click here to download our free guide to reducing your bunion pain at home.
We recommend that you perform each of these exercise twice a day, morning and night, to releive your bunion pain. If your discomfort continues, make an appointment with PA Foot and Ankle Associates. One of our podiatrists will assess your condition and recommend a treatment plan for your bunions.
